

The ability to interpret welding symbols is a critical skill for welding professionals, from welders to supervisors, welding engineers, and certified welding inspectors. Yet, many find it challenging to read welding symbols on a print without specific training.
While a small percentage of companies require welders to know how to read symbols, the current shortage of skilled welders makes this prerequisite challenging to enforce. The solution lies in providing comprehensive welding symbol training. Small to medium-sized fabricators often lack in-house expertise, but external resources can bridge this gap. Industrial distributors and qualified welding equipment manufacturer representatives frequently offer welding symbol courses, sometimes at no cost or for a nominal fee.
This guide provides a basic introduction to how to read welding symbols, focusing on fundamental concepts. Whether you’re looking for information on a specific symbol like fillet weld symbols or aiming to understand the entire system, this post will get you started.
Welding Symbols Basics: The Foundation
Every welding symbol consists of two essential components: an arrow and a reference line.
- The arrow can point up or down.
- Crucially, the arrow doesn’t always point directly to the side of the joint to be welded. Due to space constraints on a drawing, the information on the reference line dictates whether the weld is on the arrow side or the opposite side.
![]()
The type of weld joint is indicated by a specific symbol. The American Welding Society (AWS) provides a comprehensive chart detailing these symbols. For this introduction, we’ll focus on fillet welds, as the associated information is displayed uniquely for different weld types.
Understanding Fillet Weld Symbols
Let’s dive deeper into fillet weld symbols, which are among the most common.

Fillet weld symbols will ALWAYS have the vertical line of the symbol positioned on the left.
Determining Fillet Weld Size
You might be asking, “how to determine the size of a weld from a welding symbol?” For a fillet weld, the weld size is typically displayed to the left of the fillet weld symbol.

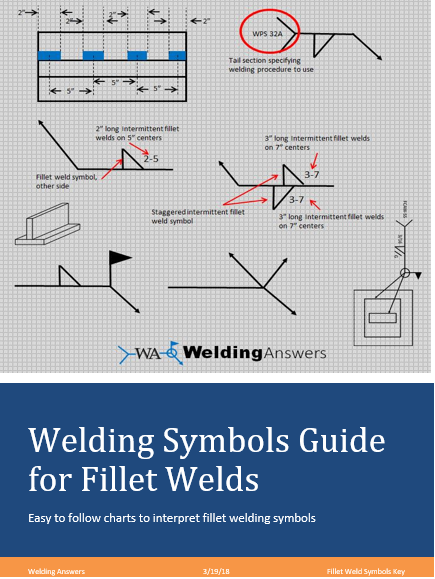
Fillet Weld Length and Intermittent Welds
- The length of the fillet weld, if it’s not the entire length of the joint, is displayed to the right of the symbol.
- Intermittent fillet weld symbols are called out using both length and pitch. The number to the right of the diagonal line of the fillet symbol indicates the length (in the US, this will be in inches unless otherwise noted). The pitch is displayed to the right of the length and indicates the distance between the centers of the weld segments.

Staggered Intermittent Welds
- Intermittent fillet welds can be on both sides of the joint, if the welds need to be in the same spot on opposite sides of the T-joint then the fillet weld symbols need to be aligned on the welding symbol.
- If the intermittent fillet welds are to be staggered, the fillet weld symbols must be staggered on the welding symbol as shown below.

Important Welding Symbol Notations
- Field Weld Symbol (Flag): If you see a flag at the intersection of the reference line and the arrow, do NOT make that weld in the shop. This field weld symbol indicates the weld must be performed on-site or “in the field.”
- Weld All Around Symbol (Circle): A circle notation at the intersection of the reference line and the arrow signifies that the weld has to go all the way around the joint.

Welding Symbols on a Print: What to Expect
While some diagrams show graphical representations of the joint configuration, actual detailed part drawings rarely do. This is precisely why understanding the different weld symbols shown on the AWS Symbols Chart is so important. A typical drawing will look something like this:
This has been a very basic introduction to welding symbols. Comprehensive training programs for reading welding symbols can range from 4 to 16 hours, often tailored to specific customer needs.
Have questions about specific welding symbols or need more in-depth training? Download the Welding Symbols Guide for Fillet Welds for free! Simply click the image below.
FREE GUIDE: Welding Symbols Guide for Fillet Welds
Source: Welding Symbols Training Manual

Learning welding symbols is necessary for many professionals in the welding industry. From welders to welding inspectors, from estimators to quality personnel, knowing this language is an absolute necessity.
The Welding Symbols Training Manual will teach you welding symbols starting from the most basic elements all the way to the very complex symbols. A total of 121 review problems provide plenty of opportunity to test your knowledge as you learn.
You will also get the Welding Symbols Guide which will allow you to interpret welding symbols even before you learn this language. Simply find the type of symbol and use the graphical guide to determine the meaning of all the elements of the symbol at hand.
In addition to the 121 review problems in the Welding Symbols Training manual you also get a comprehensive, 40-question Welding Symbols Test to gauge your proficiency with welding symbols. (Answer keys are provided for both the review problems and the comprehensive test).