Manufacturers of welding consumables are required to provide certificates of conformance for all of their welding filler metals. These certificates confirm that their consumables conform to the chemical and mechanical requirements determined by the American Welding Society for that specific filler metal. Manufacturers are not required to test every single batch of product that they produce. Instead, depending on the filler metal they either have to do this test every year or every three years. These certificates are known as “typical” certificates. In some cases, codes or specific customer requirements necessitate the manufacturer of the filler metal to provide “actual” certificates of conformance. This means that a specific test or set of tests were performed using a specific production batch, and this batch is what is sold to the customer. This is done to have full traceability of the product and for added assurance that the product meets all requirements.
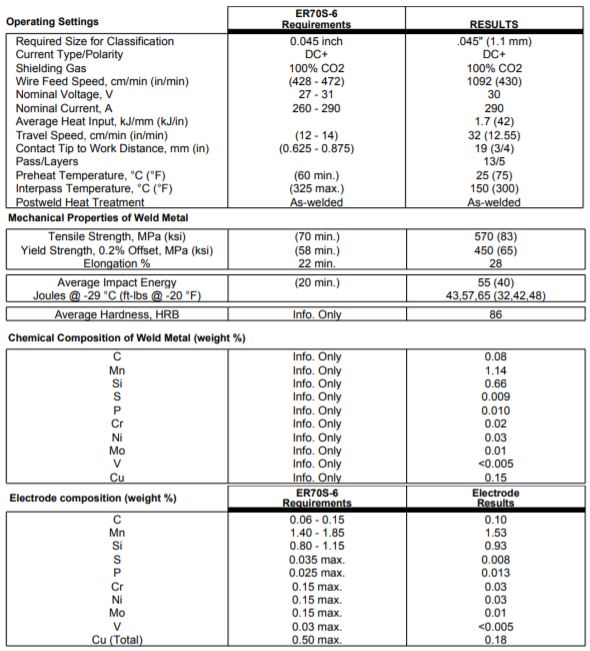
Regardless of whether you are looking at a typical or actual certificate of conformance you will probably see the same sections and sets of numbers. As you can see below there are three main areas: operating settings, mechanical properties, and chemistry analysis.
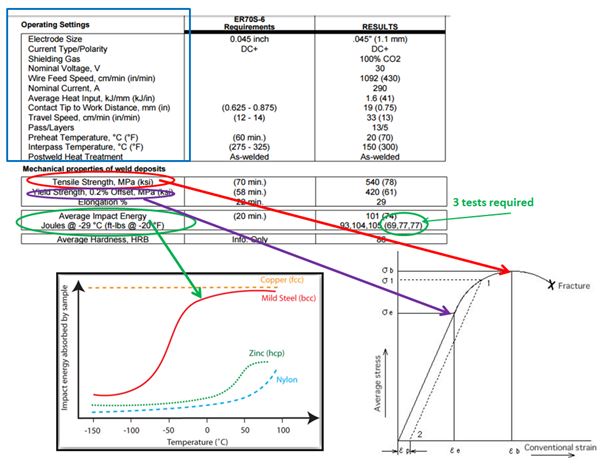
The operating settings are simply a sort of WPS that was used to run the test. The area of concern is the second section – mechanical properties. You are probably familiar with the AWS classification for some mig wires, for instance, an ER70S-6. The “70” denotes this wire has a minimum tensile strength of 70,000 psi. Tensile strength, also known as Ultimate Tensile Strength (UTS) is the point at which a part would fracture.
Yield strength (which will always be lower than tensile strength) is the point at which a material will experience plastic deformation. This means that if you stress a material below its yield point it will elongate, but when the stress is removed it will go back to its original shape. However, when you stress it beyond its yield point, but below its UTS, and remove the stress the material will no longer go back to its original shape.
Impact properties, also know, as charpy-v notch values are results of a test that measures a material’s (in this case a weldment’s) toughness, or ability to resist the propagation of a crack. The specimen to be tested is machined and will have a notch to simulate a crack. This test is important when testing existing structures, such as bridges, to ensure they are fit for service when they have discontinuities, such as cracks.
Toughness is tested at cold temperatures. At warmer temperatures materials experience more ductile behavior, but in extreme cold they become more brittle. Since this is the worst case scenario this is where we want the welds to be tested. If you notice there are three values for the results. In the certificate shown above those are 43, 57, 65 Joules at -29˚C (32, 42, 48 ft-lbs @ -20˚F). An average for these is also given. For the weld to pass this requirement the average must be above the required minimum and no single value must be below this minimum either. Specific applications may require different acceptance criteria.
The chemical analysis provides information on the deposited weld metals chemical makeup. Ranges of different elements are critical as they can significantly affect mechanical properties.


how can we select a proper filler and welding process for a material?
Selecting the right welding process depends on the application and your goals. The process is chosen based on: required quality, productivity, skill level of welder/operator, welding position, etc. The filler metal selection starts with knowing your requirements. Do you need to match the base metal chemical and physical characteristics? Is the application joining or surfacing? the skill of your operators can also come into play.
There are countless variables we can consider. The most basic information you would need is the strength requirement and in-service application requirements.