Are you a welding professional looking to improve weld quality, boost productivity, and save money on costly qualification tests? You’ve come to the right place!
The AWS D1.1 Structural Welding Code – Steel is a powerful tool for fabricators. It offers a huge advantage: prequalified welding procedures. This means you can create a welding procedure specification (WPS) that is exempt from expensive and time-consuming qualification tests. All you have to do is follow the rules laid out in the code.
This guide will walk you through a simple, step-by-step process for writing your own prequalified welding procedure that is in full compliance with the AWS D1.1 code. Whether you’re a welder, welding supervisor, welding engineer, or even a business owner, understanding this process can be a game-changer for your company’s bottom line and quality control.
First, let’s quickly address some common questions about prequalified WPSs.
Why are Prequalified Welding Procedures so Important?
Saves Time and Money: A single qualification test for a welding procedure can cost anywhere from $500 to $1,200. Prequalified procedures eliminate this cost entirely, which is a huge win for any metal fabricator.
Ensures Quality: By following the prequalification rules, you’re using a welding procedure that is already proven to produce sound welds. This takes the guesswork out of your welding operations and helps maintain consistent weld quality.
Doesn’t Require Certification: You don’t need to be a welding inspector or welding engineer to write a prequalified WPS. The code itself provides all the instructions you need.
What do you Need to Get Started?
There’s really only one essential item: a copy of the latest edition of the AWS D1.1 Structural Welding Code – Steel. Without it, you won’t have access to the tables and figures you need to correctly write your procedure. The cost of the codebook is a small investment that will quickly pay for itself by saving you from having to conduct even a single qualification test.
Ready to start writing your own prequalified WPS? We’ve broken down the process into eight simple steps.
The 8 Steps to Write Prequalified Welding Procedures
The AWS D1.1 code is designed to help you create these procedures by organizing all the necessary information into one section. Just follow these steps in order, and you’ll be well on your way to developing a compliant WPS.
Step 1: Select an Approved Base Metal
Not all steels can be used in a prequalified WPS. The code provides a list of approved base metals in Table 5.3 – Approved Base Metals for Prequalified WPSs. If your base metal isn’t on this list, you’ll have to qualify your WPS through testing.
Some common approved steels are:
ASTM A36
ASTM A500
ASTM A516
ASTM A572
ASTM A709
Step 2: Choose a Prequalified Weld Joint
Next, you need to select a joint that is also prequalified by the code. Figures 5.1 through 5.5 in AWS D1.1 illustrate all the prequalified joint details, including butt joints, T-joints, and corner joints, as well as groove and fillet welds.
It is absolutely critical to pay attention to the specific dimensions and tolerances for each joint type. For example, this prequalified joint for a single V-groove weld has specific tolerances for the groove angle and root opening. Deviating from these details makes your WPS non-compliant.
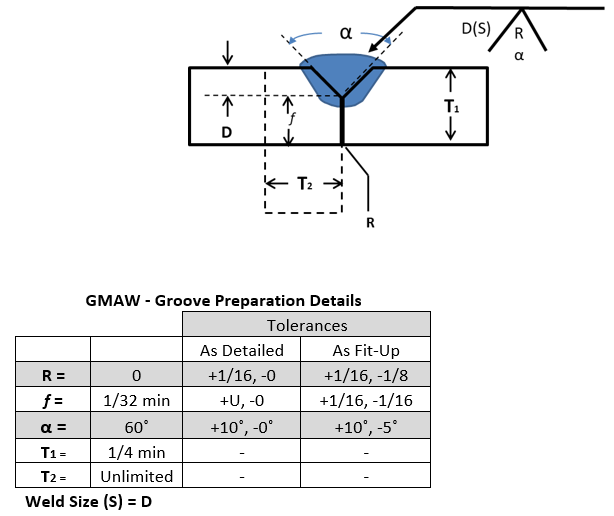
This prequalified weld joint is for a single V-groove weld butt joint (BC-P2-GF). AWS D1.1/D1.1M:2020 Structural Welding Code (Steel) provides prequalified weld joints for fillet welds, complete joint penetration (CJP) welds and partial joint penetration (PJP) welds. Refer to Figures 5.1 through 5.5 of your code book.
As stated above, it is important to pay attention to the footnotes when looking at the code book. For this particular joint and for the GMAW process the footnotes specify the following additional requirements:
- The joint shall be welded from one side only.
- Minimum weld size (S) as shown in Table 5.5. Depth of groove (D) as specified on drawings
- The orientation of the two members in the joints may vary from 135˚ to 180˚ for butt joints, or 45˚ to 135˚ for corner joints, or 45˚ to 90˚ for T-Joints
As seen above, the prequalified joint has “as detailed” and “ as fit-up” tolerances. These must be strictly kept to remain compliant.
So, there you have it. Now you know how to select an approved base metal and a prequalified weld joint for your prequalified WPSs.
Step 3: Pick a Prequalified Welding Process
AWS D1.1 only allows certain arc welding processes for prequalified procedures. These are:
✅ Approved Processes:
Shielded Metal Arc Welding (SMAW)
Submerged Arc Welding (SAW)
Gas Metal Arc Welding (GMAW), except GMAW-S
Metal Cored Arc Welding (MCAW)
Flux Cored Arc Welding (FCAW)
❌ Processes NOT Approved for Prequalified WPSs:
Gas Metal Arc Welding – Short Circuit (GMAW-S)
Gas Tungsten Arc Welding (GTAW)
Electroslag Welding (ESW)
Electrogas Welding (EGW)
If your process isn’t on the approved list, you must qualify your WPS by testing.
Step 4: Select the Correct Welding Consumables
This step involves choosing the right filler metal, shielding gas, and/or flux for your chosen process and base metal. Table 5.4 of the code provides a list of matching strength filler metals for the approved base metals. This ensures that the filler metal has a tensile strength that matches the base metal.
For processes using a shielding gas (like GMAW and FCAW), Table 5.7 lists the approved gases and their composition ranges. For SAW, the code specifies approved filler metal and flux combinations. Always verify that your consumables meet the requirements of Section 5.6.3 of AWS D1.1.
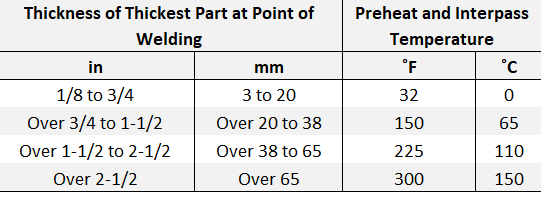
Step 5: Determine Preheat and Interpass Temperatures
Preheat is a critical factor in preventing weld cracking, especially with thicker materials.
Table 5.8 – Prequalified Minimum Preheat and Interpass Temperature of AWS D1.1 provides the minimum preheat and interpass temperature for all prequalified base metals. Keep in mind that the same base metal may require different preheat and interpass temperatures depending on its thickness. For example, the minimum preheat and interpass temperature for ASTM A36 is as follows:
Step 6: Determine Post Weld Heat Treatment (PWHT)
PWHT is used to improve mechanical properties and relieve residual stresses. Most PWHT procedures are defined by contract documents. To be considered prequalified, your PWHT must meet the conditions listed in Section 5.8 of the code, including limitations on base metal yield strength and manufacturing methods.
Step 7: Understand all Mandatory WPS Requirements
Since you are bypassing qualification testing, you must strictly follow all the rules. Table 5.1 outlines prequalified WPS requirements and limitations for various welding variables, such as maximum electrode diameter, maximum current, and maximum single-pass fillet weld size. It is essential to adhere to the footnotes in this table as they provide critical additional information.
Table 5.1 – Prequalified WPS Requirements of AWS D1.1/D1.1M:2020 Structural Welding Code (Steel) provides limits for the following:
- Maximum electrode diameter
- Maximum current
- Maximum root pass thickness
- Maximum fill pass thickness
- Maximum single pass fillet weld size
- Maximum single pass layer width
As with many other tables in AWS D1.1 this table has several footnotes. Pay special attention to these footnotes as you write your prequalified WPS.
If you take a look at Table 5.1 you’ll see that for Maximum Current there is a note that reads “Within the range of operation recommended by the filler metal manufacturer.” This brings us to the final part of the course: Selecting the right welding parameters and writing your first prequalified WPS.
Step 8: Write Your First Prequalified WPS
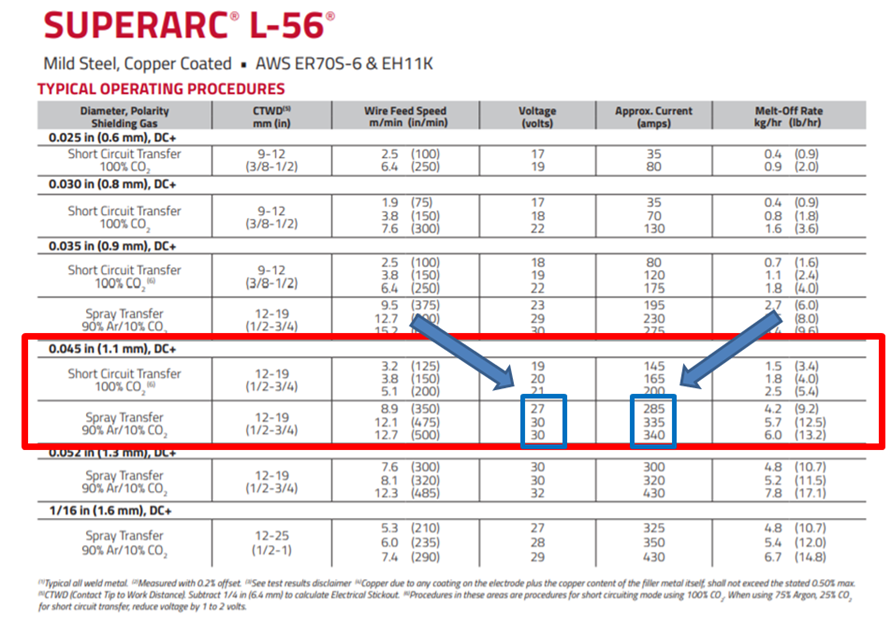
You’re almost there! All the previous steps have prepared you to write the final document. The last thing you need to do is select the specific welding parameters (amperage, voltage, travel speed, etc.) that you will use.
The easiest way to do this is to consult the filler metal manufacturer’s literature. They provide recommended operating ranges for their electrodes. For example, if you are using GMAW, the manufacturer’s data sheet will give you ranges for wire feed speed, amperage, voltage, and contact tip to work distance (CTTWD). Just make sure these ranges fall within the tolerances specified in Table 5.2 – Essential Variables for Prequalified WPSs.
Congratulations! You now have a comprehensive understanding of how to write a prequalified welding procedure specification in compliance with AWS D1.1.
If you found this guide helpful, you’ll love our free, in-depth PDF guide: How to Write AWS D1.1 Prequalified Welding Procedures. It includes more detailed explanations, examples, and a fill-in-the-blank template to make writing your first WPS a breeze.
➡️ Click here to download your free PDF guide and become a welding procedure master today!
WOULD YOU RATHER HAVE PREQUALIFIED WELDING PROCEDURE DONE FOR YOU?
You have been provided clear instructions on how to write prequalified WPSs in accordance with AWS D1.1 Structural Welding Codes – Steel. We hope that you now feel comfortable in writing your prequalified WPSs. However, not everyone will choose to do so. If you rather have the prequalified WPSs done for you we can help.
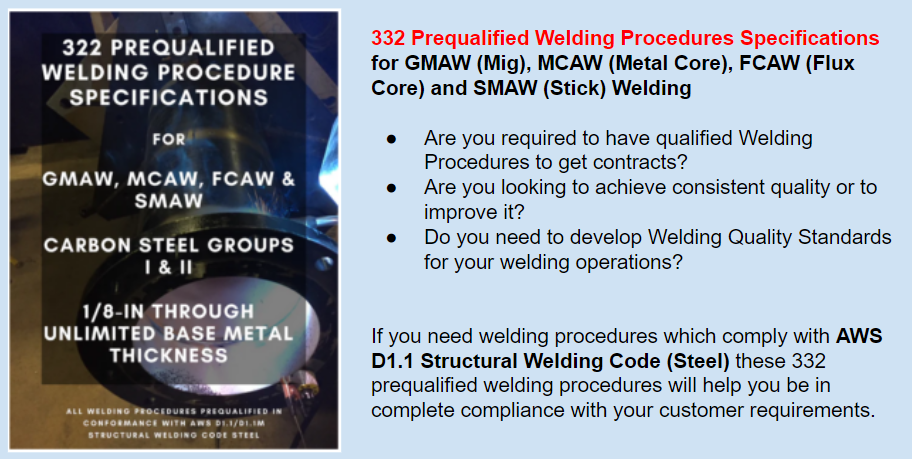
Our publication 322 Prequalified Welding Procedure Specifications for Steel Fabricators provides prequalified WPSs for SMAW, GMAW, MCAW, FCAW-G and FCAW-S.
If you only need prequalified welding procedures for a specific process those are available as well. Simply visit our online store to choose what you need.
322 Prequalified Welding Procedure Specification for Steel Fabricators