
If you work with AWS D1.1 you are probably familiar with the use of prequalified welding procedures. The use of prequalified WPSs provides many benefits to the fabricator, one of which is costs savings due being exempt from having to perform costly testing to qualify the welding procedure. However, if you are looking to save money you should be aware of other important things when using prequalified WPSs which can lead to additional savings.
When it comes to complete joint penetration (CJP) groove welds it is basically all about volume. If we reduce the weld volume we will generally (not always) reduce costs associated with materials and labor. Paying attention to the joint configuration we use can save us a lot of money.
Here are a few things to consider when looking to reduce costs associated with CJP welds.
- Use prequalified welding procedures to avoid costly testing (when permitted)
- Choose a prequalified joint that reduces weld volume
- Consider the cost of plate preparation
- Consider the options provided for groove dimensions (root opening and groove angle)
In this article we will dicuss number 4 above.
Consider the following example:
You need to peform a CJP V-groove weld with backing on 1/2in [13mm] thick material using the SMAW process in the flat (1G) position. From experience you know this is a prequalified joint. You go to your AWS D1.1 code book and find prequalified joint B-U2a.
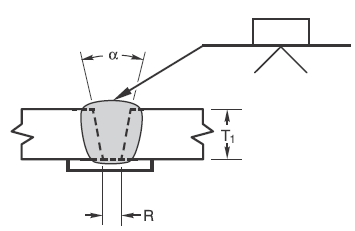
There are many requirements for using prequalified WPSs. One of the requriements is adhering to the permitted joint dimensions. In Figure 5.1 of AWS D1.1 (2020) you find the prequalified CJP groove welded joint details for this configuration. When using SMAW there are three options for root opening and a corresponding groove angle.
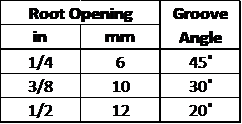
These combinations are considered adequate for achieving proper penetration and fusion to the side walls. You’ll notice that the wider the root opening the narrower the groove angle. This makes sense because we are concerned with being able to angle the electrode in such a way that we are able to achive proper fusion.
Back to our example. You can pick either of the three combinations as they are all prequalified. You may pick based on the least amount of plate preparation which would be the 20-degree angle with ½-inch root opening.
There is a difference in volume for each of these options. If you do the math, every foot of weld for each option requires a certain amout pounds of weld metal when welding ½-inch material.
![Weight of weld metal needed per foot of weld for 1/2" [13mm] plate.](https://weldinganswers.com/wp-content/uploads/2018/04/003-weld-volumes-for-half-inch.png)
Going with the 20-degree bevel requires 25.6% more weld metal that using the 45-degree bevel with the smaller root opening of ¼-inch [6mm]. Not a big deal if we only have 100-ft of weld to do. But what if we had 4,000-ft of weld to do? The 20-degree would require 4,520 pounds of weld metal compared to 3,600lb with the 45-degree groove angle. Considering the efficiency of SMAW electrodes (~65%) it will require 6,954 pounds with the 20-degree compared to 5,539. That is a difference of 1,415lbs.
This can be roughly $2,000 in material, but considering a depostion rate of about 5lb/hr you are also looking at an extra 283 labor hours. And this figure does not include the time for the extra chipping of slag.
Of course we need to consider the cost of beveling the plates to achieve a 45-degree angle versus the 20-degree angle.
So, you may think you must always go with the widest angle and narrowest root opening. This, however, is not the case. Consider welding 3-inch [75mm] thick plates. Here are the numbers showing the weight of weld metal per foot of joint when welding 3-inch thick plate:
![Weight of weld metal needed per foot of weld for 3" [75mm] plate.](https://weldinganswers.com/wp-content/uploads/2018/04/004-weld-volumes-for-3-inches.png)
The moral of the story is to always calculatate your weld volumes. Don’t assume that one combination of groove angle and root opening will be the best all the time. Look at your plate thickness, consider the cost of plate preparation, consider the welding process being used and the ease with which the welder can achieve proper electrode angles.
Although using prequalified welding procedures typically saves you money, you should always consider using a welding procedure with a joint configuration that is not prequalified. One of the drawbacks of using prequalified welding procedures is that you may be missing out on reducing costs by having to use specific joint dimensions. Could you reduce the groove angle to 10-degrees? Or have not groove angle at all? Maybe increase the root opening to ¾-inch with no bevel? This may not be feasible, but it should get you thinking.
You should also consider other prequalified joints that can further reduce weld volument such as a double-sided CJP groove weld as shown below. This way you reduce the weld volume and still take advanaget of using a prequalified WPS.

In this case your weld volume is drastically reduced but you increase labor times associated with plate preparation and backgouging. You also need to consider if you can reach both sides of the joint. This may not be feasible simply from a reach standpoint.
If your job responsibilities include cost reduction in welding operations you must always be looknig at all your options to optimize productivity and improve efficiencies. Joint details is one of those options.
Reference: Welding Procedure Development for Non Welding Engineers
Does your operation need welding procedures? Are you looking for consistency in quality and productivity in your welding operations? Don’t forget that we offer an extensive library of ready-to-use prequalified carbon steel welding procedures specifications in conformance with AWS D1.1 Structural Welding Code – Steel.

____________________________________________________________________
Are you looking to qualify welding procedures and/or welders? Are you using AWS D1.1 Structural Welding Code -Steel as your quality standard?
 “Qualifying Welding Procedures, Welders and Welding Operators” is a guide developed to help you peform your own qualifications in full compliance to AWS D1.1 Structural Welding Code. It provides step-by-step instructions on how to qualify welders and welding procedures. It also provide step-by-step instruction on the proper use of prequealified welding procedures.