

Welding aluminum and its alloys doesn’t have to be complicated, but it’s not the same as welding carbon steel. Aluminum continues to be one of the most common structural base metal for a variety of reasons. As the demand for aluminum continues to increase it is necessary to understand how weld to successfully weld this metal. Whether you are wan to know how to weld 6061-T6 aluminun or another aluminum alloy, you have to understand a few key characteristics of aluminum that make it a different animal.
Aluminum has four characteristics that make it unique in the welding world:
- High thermal conductivity: It dissipates heat extremely fast.
- High solidification shrinkage: It shrinks a lot as it cools from a liquid to a solid.
- High hydrogen solubility: It absorbs a lot of hydrogen while molten.
- Tenacious oxide coating: A strong, protective oxide layer forms instantly in the presence of oxygen.
We’ll explain how each of these characteristics can cause common welding problems and, most importantly, how you can fix them.
Mistake 1: Not Enough Heat Input
Aluminum’s high thermal conductivity turns it into a very effective heat sink. It pulls heat away from the weld zone much faster than steel. This can lead to “cold” starts, especially with the GMAW (MIG) process, resulting in lack of fusion and a poor bead profile. It’s like trying to start a campfire with wet kindling—the heat just gets sucked away.
The solution? Weld aluminum hot and fast.

This might feel counterintuitive if you’re used to welding steel, but with aluminum, you need to put enough heat into the joint to overcome the rapid dissipation. Many modern welding machines have a hot start or crater fill feature that automatically increases the amperage at the beginning and end of the weld. If your machine has this, use it. If not, you can get a similar effect by starting your weld with slightly higher amperage for the first half-inch before settling into your main welding parameters.
Mistake 2: Ignoring Solidification Shrinkage
As aluminum cools from a molten state, it shrinks significantly more than steel. This can create a problem called a crater crack at the end of the weld bead. When you terminate the arc and the weld metal solidifies, the last bit of molten metal in the crater has nowhere to pull from, leading to a crack right at the end of the weld.
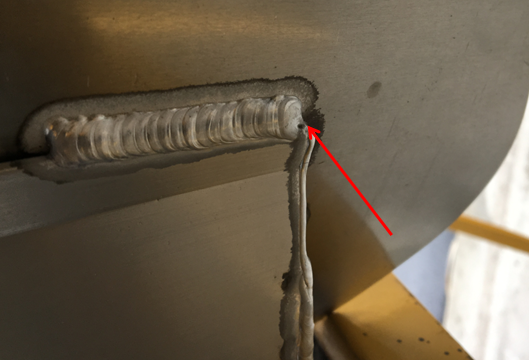
These cracks may seem minor, but they can be a starting point for a larger failure, especially under cyclic loading. The fix is surprisingly simple.
There are two primary ways to avoid crater cracks:
- Use a backstep technique: At the end of your weld, simply reverse direction for about half an inch. This adds a little extra filler metal to the crater, giving the shrinking metal what it needs to solidify without cracking.
- Use crater fill settings: Many advanced machines have a crater fill option. This setting allows you to program a specific low-amperage procedure for the end of the weld. When you release the trigger, the machine will drop to this lower setting for a specified time, filling the crater and allowing it to cool and solidify slowly and properly.
To learn more about cracks in aluminum read 6 Factors that Lead to Cracks in Aluminum Welds.
Mistake 3: Not Paying Attention to Moisture
Aluminum has an extremely high affinity for hydrogen when molten. If any hydrogen gets into the weld, it will be absorbed like a sponge. As the weld cools and solidifies, the hydrogen is released from the metal’s structure, but it can’t escape fast enough. The result is porosity, which looks like tiny holes in the weld bead.
Hydrogen is most often introduced into the weld from moisture. This can be from a few different places:
- Water or moisture on the base metal.
- Condensation on the filler metal.
- Contaminated shielding gas lines.
Always ensure your work area and materials are completely free of moisture. Store filler metal in a dry, heated environment and make sure your shielding gas lines are checked regularly for leaks or moisture contamination.
Mistake 4: Not Removing the Oxide Layer
Aluminum reacts instantly with oxygen in the atmosphere to form an aluminum oxide layer. This layer is very tough and provides excellent corrosion resistance, but it has a melting point of over 3,700°F (2,038°C), while the base aluminum melts at a mere 1,220°F (660°C). This creates a significant problem for welding. If the welding arc doesn’t completely break through this oxide layer, it can lead to aluminum oxide inclusions and lack of fusion.
To prevent this, you must properly prepare the base metal before welding. Follow these three simple steps:
- Remove all moisture sources: As discussed above, moisture is a major source of porosity.
- Degrease the base metal: Use a clean rag and a solvent like acetone to remove all oils, paints, grease, and other hydrocarbons. These substances are a source of hydrogen and can also cause weld defects.
- Mechanically remove the oxide layer: This is the most critical step. Use a stainless steel wire brush dedicated only to aluminum to remove the oxide layer right before you weld. Don’t use a brush that has been used on steel, as it will contaminate the aluminum. A file or a carbide burr can also be used.
By understanding and addressing these four common mistakes, you can significantly improve the quality and productivity of your aluminum welding operations. While other problems can arise, these four account for the vast majority of weld defects we see with 6061-T6.