A Welding Procedure Specification (WPS) is much more than a formality — it’s the foundation of weld quality and consistency. A WPS outlines the essential and nonessential variables that control the welding process, along with their acceptable ranges. When welders stay within these limits — and have the right skills — they can produce sound, repeatable welds.
The process of developing a WPS can vary depending on the material. Writing a procedure for super duplex stainless steel is far more complex than one for low-carbon steel. However, the steps you must follow are almost always the same.
Too often, the person writing the procedure jumps straight to setting amperage and voltage. While these parameters matter, several important steps come first. Following them will help ensure your procedure produces strong, defect-free welds — every time. Below are some areas that are not always given the proper attention when develoing a welidng procedure.
1. Understand the Base Metal
Before selecting machine settings, start with the base metal.
Even if material selection falls to the design engineer, the person developing the WPS must understand how that material reacts to the heating and cooling cycle of welding.
Ask key questions:
Is the base metal susceptible to hardening, cracking, or distortion?
Will it lose corrosion resistance when heated?
Does it require preheat or post-weld heat treatment to maintain toughness or ductility?
Understanding how the base metal responds to welding ensures your procedure addresses metallurgical concerns before they become production problems.
2. Select the Right Welding Process
The welding process drives both quality and productivity.
While economics often lead fabricators to choose the fastest process, that’s not always the best approach. For example:
If a high heat input is required, Submerged Arc Welding (SAW) may outperform Gas Metal Arc Welding (GMAW), even though GMAW is more flexible.
SAW offers high deposition rates but is limited to flat and horizontal positions.
Other factors that influence process selection include:
Welding position (flat, vertical, overhead)
Environment (shop vs. field)
Welder skill level
Filler metal availability
Customer or code requirements
The process you choose directly affects productivity, quality, and cost. Choose carefully.
3. Select the Correct Filler Metal
Choosing the right filler metal goes hand-in-hand with understanding the base material.
Sometimes, simply matching the strength of the base metal is enough. In other cases, it’s necessary to undermatch to prevent cracking. You might also need to use a filler with specific alloying elements to avoid problems like solidification cracking or corrosion.
The goal is to select a filler that delivers the desired mechanical and chemical properties in the finished weld.
4. Determine the Joint Details
Joint design plays a major role in both weld quality and production efficiency.
Most fabrications use fillet welds, but switching to a partial joint penetration (PJP) groove weld can sometimes reduce cost. Similarly, choosing the correct included angle for a complete joint penetration (CJP) weld can cut weld volume — and welding time — dramatically.
However, it’s not just about speed. A joint with too tight of an angle can cause slag inclusions or lack of fusion, resulting in costly rework.
Prequalified joint details specified in AWS codes help ensure quality, but they may not be the most productive. Consider alternatives when production efficiency is a concern.
5. Determine if Preheat or PWHT Is Required
Preheat and post-weld heat treatment (PWHT) are essential for controlling the metallurgical changes that occur during welding.
These factors depend on:
Base metal composition and thickness
Joint restraint
Required mechanical properties
For example:
To maintain ductility, preheat the joint and allow it to cool slowly.
To achieve high hardness, skip preheat and increase cooling rate.
Proper control of heating and cooling minimizes the risk of cracking, distortion, and brittleness.
6. Establish Ranges for Welding Variables
Once you’ve completed the steps above, it’s time to set the welding parameters — amperage, voltage, travel speed, wire feed speed, and shielding gas flow rate.
These ranges can be determined in two ways:
By referencing a Procedure Qualification Record (PQR) that has been tested and approved, or
By using the allowable ranges from the applicable welding code (such as AWS D1.1 or AWS D1.6) for prequalified procedures.
Every variable influences quality and productivity:
A WPS written for maximum quality may reduce speed and throughput.
A WPS written for maximum productivity may increase rework.
The best welding procedures find the balance — delivering consistent quality and optimal efficiency.
The Impact of Welding Variables
Each variable affects multiple aspects of the weld.
For instance:
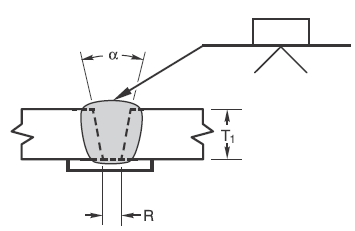
Travel angle changes bead profile, penetration, and even gas coverage.
Voltage influences arc length and bead width.
Travel speed affects heat input, distortion, and reinforcement height.
Developing a welding procedure isn’t just a paperwork exercise — it’s a critical engineering task that affects every part of the fabrication process.
Following these basic steps ensures your WPS supports both quality and productivity, whether you’re welding carbon steel, stainless steel, or specialty alloys.
Even if the material seems easy to weld, never skip the fundamentals. The best welding procedures are written by those who understand the why behind every variable.
Reference
Miller, D.K. “What Every Engineer Should Know about Welding Procedures.”
The National Steel Construction Conference Proceedings, Chicago, AISC, 1997.